Diy: Cd Player
Congratulations – you've built a fully functional CD player from e-waste!
Now play your favorite album and enjoy the analog warmth.
Building a DIY CD player is a rewarding project that ranges from repurposing old PC hardware to assembling high-fidelity audiophile kits. Depending on your technical comfort level, you can build a basic functional unit or a custom-designed piece of audio gear.
🛠️ Method 1: The "Hacker" Build (Repurposing a PC CD-ROM)
This is the most popular DIY route. It involves using an old IDE/SATA computer drive and a dedicated controller board to turn it into a standalone player. Core Components
CD-ROM/DVD-ROM Drive: Older IDE drives (with a 40-pin connector) are easier to work with. Search for used IDE drives on marketplaces like eBay.
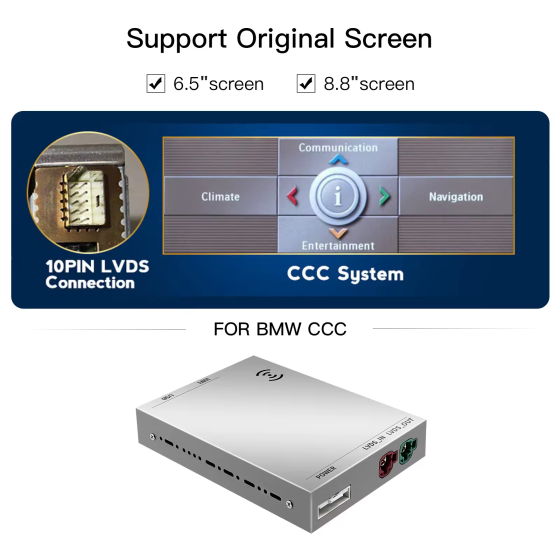
CD-ROM Controller Kit: A board that provides buttons (Play, Stop, Next), a display, and a remote. These are widely available on AliExpress or Amazon.
Power Supply: You need a dual-voltage supply (12V for the motor, 5V for the logic).
External DAC (Optional): To improve sound, connect the drive's digital output (S/PDIF) to an external Digital-to-Analog Converter. High-Level Steps
Connect the Controller: Plug the controller's ribbon cable into the back of the CD-ROM drive.
Wiring Power: Connect the power supply to both the drive and the controller board using a Molex connector.
Audio Output: Use the analog output from the drive's front headphone jack or the rear pins, or use the digital output for a higher-quality external DAC.
Enclosure: Mount the components in a custom case (acrylic, wood, or 3D-printed). 🏗️ Method 2: The Audiophile Kit (Tentlabs & Others)
If you want professional sound quality without designing the circuitry from scratch, a high-end kit is the way to go. Companies like Tentlabs provide modular sets [10]. Why Choose a Kit?
Pre-Tested Modules: The laser mechanism and main logic boards come pre-assembled [10].
Superior Clocking: High-quality "low jitter" clocks ensure better timing and clearer audio.
Customization: You can still choose your own chassis, connectors, and internal wiring. 💿 Creating Your Own Media
A player is only half the project. To make custom CDs for your DIY player, you need to burn them correctly for maximum compatibility.
Format: Use CD-R (not RW) for the best compatibility with DIY and older players [17, 26].
Software: Tools like ImgBurn or CDBurnerXP allow you to include CD-Text so song names appear on your display [6, 18].
Quality: Source high-quality files (WAV or FLAC at 16-bit/44.1 kHz) to ensure "Red Book" standard compliance [26]. ⚖️ Pro-Tips for DIY Success
Slow Down: Burn your CDs at the slowest possible speed (e.g., 2x or 4x) to reduce read errors on DIY mechanisms [26].
Safety First: If using a raw laser mechanism, never look directly at the laser, even if you think it's off.
Top-Loading Design: Many DIYers prefer "top-loading" builds (no motorized tray) because they are mechanically simpler to build into a custom box. Find a specific wiring diagram for a CD-ROM controller. Create a shopping list of components for a budget build. Troubleshoot burning settings if your discs aren't playing. YouTube
Building your own CD player ranges from simple aesthetic "upcycling" to high-end audiophile engineering. Most DIY projects fall into two categories: repurposing old computer drives or building a standalone high-fidelity transport. 1. The Simple Build: PC Drive Conversion cd player diy
This is the most common entry-level project. You can convert an old IDE or SATA CD/DVD-ROM drive into a standalone player with minimal soldering. Instructables Core Components:
An old PC CD-ROM drive, a power supply (providing 5V and 12V), and amplified speakers. Key Requirement:
Use a drive with a physical "Play" button on the front panel; this allows it to operate without a computer. Audio Output:
You can plug speakers directly into the front headphone jack or mod a CD-to-soundcard cable into standard RCA jacks for a cleaner "line-out" signal. Instructables 2. The Audiophile Build: Component-Based
For those seeking high-fidelity sound, the focus shifts to using professional-grade "transports" and dedicated digital-to-analog converters (DACs). The Heart: High-end builders often use the Philips CD-Pro2M transport mechanisms. Power Management:
Clean power is critical. Expert builders recommend a two-box system: one for the noisy transformers and a separate chassis for the sensitive audio electronics. Power Sequencing:
To protect the delicate laser assembly, the +5V supply (for logic) should activate slightly before the +9V supply (for motors). University of Illinois Urbana-Champaign 3. Modern Aesthetic DIY
For many users, "DIY" means personalising existing hardware rather than building from scratch. Sticker Decorating:
Customising handheld "Discman" style players with stickers and themed albums is a popular trend on platforms like Visual Mods:
Creating "clear" or aesthetic CD cases to show off the disc as it spins is a frequent project for modern retro-enthusiasts. Essential Component Checklist Reads the physical disc Repurpose a DVD-ROM from an old laptop. Converts digital data to sound
Use an external DAC to bypass "noisy" internal PC drive chips. Servo System Controls laser and motor
Most pre-made kits include a controller and LCD for track info. Houses everything
3D-printed parts or even wooden boxes can create a unique look. soldering guide
for a specific CD-ROM controller kit, or are you more interested in aesthetic customisation Tutorial para hacer un CD claro y estético 29 Aug 2020 — Tutorial para hacer un CD claro y estético thestrawberrycow_ Decorating My Handheld CD Player with Stickers and Albums 17 Sept 2024 — Decorating My Handheld CD Player with Stickers and Albums random.c.i
Create Your Own CD Player: A Fun DIY Project
Are you looking for a unique and exciting DIY project that combines music, electronics, and creativity? Look no further! Building a CD player from scratch can be a rewarding experience that allows you to customize your music listening experience. In this article, we'll guide you through the process of creating your own CD player at home.
Materials Needed:
Step 1: Choose Your CD Drive
The first step is to acquire a CD drive. You can salvage one from an old computer or purchase a used one online. Make sure it's compatible with your microcontroller and has a good reading mechanism.
Step 2: Select Your Microcontroller
The microcontroller is the brain of your CD player. Popular options include Arduino and Raspberry Pi. Choose one that suits your needs and has enough processing power to handle audio decoding.
Step 3: Add a Digital-to-Analog Converter (DAC)
A DAC converts digital audio signals into analog signals that can be played through a speaker. You can use a dedicated DAC IC or a microcontroller with a built-in DAC. Congratulations – you've built a fully functional CD
Step 4: Amplify the Audio
An audio amplifier boosts the audio signal to drive a speaker. You can use a dedicated amplifier IC or a simple transistor-based amplifier.
Step 5: Assemble the CD Player
Mount the CD drive, microcontroller, DAC, and amplifier on a wooden or plastic casing. Connect the components using jumper wires and solder them together.
Step 6: Write the Software
If you're using a microcontroller, you'll need to write software to control the CD drive, decode audio, and play it through the speaker. You can use libraries and frameworks like Arduino's CDPlayer library or Raspberry Pi's PyAudio library.
Step 7: Add a Speaker and Power Supply
Connect a speaker to the amplifier and a power supply to the CD player. Make sure the power supply is sufficient to power all components.
Tips and Variations:
Example Circuit Diagram:
Here's a simple example of a CD player circuit using an Arduino and a DAC: $$ \beginarrayc CD\ Drive\ \ \ \ \ \ \ \ \ \ \ \ \ \ \ \ \ \ \ \ \ \ \ \ \ \ \ \ \ \ \ \ \ \ \ \ \ \ \ \ \ \ \ \ \ \ \ \ \ \ \ \ \ \ \ \ \ \ \ \ \ \ \ \ \ \ \ \ \ \ \ \ \ \ \ \ \ \ \ \ \ \ \ \ \ \ \ \ \ \ \ \ \ \ \ \ \ \ \ \ \ \ \ \ \ \ \ \ \ \ \downarrow \ Microcontroller\ (Arduino)\ \ \ \ \ \ \ \ \ \ \ \ \ \ \ \ \ \ \ \ \ \ \ \ \ \ \ \ \ \ \ \ \ \ \ \ \ \ \ \ \ \ \ \ \ \ \ \ \ \ \ \ \ \ \ \ \ \ \ \ \ \ \ \ \ \ \ \ \ \ \ \ \ \ \ \ \ \ \ \ \ \ \ \ \ \ \ \ \ \ \ \ \ \ \ \ \ \ \ \ \ \ \ \ \ \ \ \ \ \ \downarrow \ Digital-to-Analog\ Converter\ (DAC)\ \ \ \ \ \ \ \ \ \ \ \ \ \ \ \ \ \ \ \ \ \ \ \ \ \ \ \ \ \ \ \ \ \ \ \ \ \ \ \ \ \ \ \ \ \ \ \ \ \ \ \ \ \ \ \ \ \ \ \ \ \ \ \ \ \ \ \ \ \ \ \ \ \ \ \ \ \ \ \ \ \ \ \ \ \ \ \ \ \ \ \ \ \ \ \ \ \ \ \ \ \ \ \ \ \ \ \ \ \ \downarrow \ Audio\ Amplifier\ \ \ \ \ \ \ \ \ \ \ \ \ \ \ \ \ \ \ \ \ \ \ \ \ \ \ \ \ \ \ \ \ \ \ \ \ \ \ \ \ \ \ \ \ \ \ \ \ \ \ \ \ \ \ \ \ \ \ \ \ \ \ \ \ \ \ \ \ \ \ \ \ \ \ \ \ \ \ \ \ \ \ \ \ \ \ \ \ \ \ \ \ \ \ \ \ \ \ \ \ \ \ \ \ \ \ \ \ \ \downarrow \ Speaker \ \endarray $$
Get Creative and Have Fun!
Building a CD player from scratch is a fun and rewarding DIY project that allows you to customize your music listening experience. Don't be afraid to experiment and add your own features and effects. Happy building!
Depending on your goals—be it audiophile sound or just a fun afternoon project—you can choose from several methods:
CD-ROM Conversion: Repurpose an old PC IDE CD-ROM drive into a standalone player. This requires a drive with a front headphone jack and physical "Play" buttons, or a separate controller board and a power supply.
High-End Kits: For serious audio quality, kits like the Tentlabs DIY CD player provide high-fidelity components, including modified Philips drives, low-jitter clocks, and custom cabinets.
Modular Builds: Use specialized modules from AliExpress or Audiophonics that include a laser transport, control board, and digital-to-analog converter (DAC).
Aesthetic Customization: Give a standard portable player a "DIY" look by painting it or decorating it with stickers to match specific aesthetics like "Heisei retro" or "juminocore". Essential Components
To build a functional player, you will generally need these core parts: Decorating My Walkman Portable CD Player
Building a DIY CD player is a rewarding way to repurpose old tech or create a custom high-fidelity audio system. Projects range from simple "plug-and-play" conversions of old PC drives to complex builds using high-end components. Methods of DIY Construction
Depending on your skill level and goal, there are three primary ways to build your own player:
PC CD-ROM Conversion: The most popular "hacker" method. Older IDE-based CD-ROM or DVD-ROM drives can be turned into standalone players. Many of these drives have physical buttons (Play/Skip) and a headphone jack, allowing them to function with just a power supply. Controller Kits
: To add features like a remote control or an LCD screen, you can buy a dedicated CD-ROM Controller Kit Step 1: Choose Your CD Drive The first
. These interface with the drive via an IDE cable and handle all playback functions.
High-End Audio Kits: For audiophile quality, kits like those from TentLabs use professional-grade transports (like the Philips CD-Pro2M ) and high-quality power regulators. Essential Components
To build a functional player, you generally need the following hardware: DIY CD Player
DIY CD player kits are an excellent way to blend high-fidelity audio with the satisfaction of a hands-on project, ranging from minimalist retro builds to high-end audiophile transports. Building your own unit typically offers better component quality for the price compared to off-the-shelf consumer models, though it requires basic soldering skills and patience. Popular DIY CD Player Projects Project/Kit Target Audience Key Features Difficulty Velleman CD Player Kit Simple assembly, basic digital output, affordable. Shigaraki Clone (DIY) Audiophiles Minimalist circuit, high-grade capacitors, "purist" sound. CDM4/CDM12 Transports Restorationists Uses classic Philips swing-arm mechanisms for longevity. Arduino/ ESP32 Control Go to product viewer dialog for this item. Tech Enthusiasts
Custom OLED screens, remote control integration, DIY housing. Core Components You'll Need
The Transport/Mechanism: This is the motor and laser assembly (e.g., Philips CDM series or Sanyo heads). It reads the physical disc. The DAC (Digital-to-Analog Converter): Often a separate board (like a Go to product viewer dialog for this item. Go to product viewer dialog for this item.
) that converts the digital bitstream into the music you hear.
Power Supply: A high-quality linear power supply is crucial for reducing "jitter" and background noise.
Chassis/Enclosure: This is where you get creative—using wood, acrylic, or brushed aluminum to house the internals. What the Community Says
I love the modularity of DIY builds. If the laser dies, I can just swap the transport module for $20 instead of trashing the whole player. [1]
Moving to a dedicated DIY transport with a separate DAC made a night-and-day difference in soundstage compared to my old Sony deck. [2] Pros and Cons
Pros: Highly customizable, easier to repair, potential for superior "audiophile" sound, and educational value. Cons:
Requires tools (soldering iron, multimeter), no warranty, and sourcing high-quality vintage mechanisms (like the Philips CDM4 ) can be expensive. Do you have a specific budget in mind for this project, or
Building a DIY CD player is a rewarding way to repurpose old tech, like a PC CD-ROM drive, into a standalone music station
. If you're looking for a "piece" to start with, here’s a breakdown of the core components and a specific recommendation. The Essential "Piece": CD-ROM Drive The heart of most DIY CD projects is a functional PC CD-ROM or DVD-ROM drive Ideal Type : Look for older IDE drives that feature physical "Play/Skip" and "Stop/Eject" buttons
on the front panel. These can play audio CDs without needing a computer connection. Connection
: Most of these drives have a built-in headphone jack and volume dial on the front, making it easy to plug in speakers directly. Other Key Components To turn that drive into a full player, you will need: Controller Kit : If your drive lacks physical buttons, you can use a CD-ROM/DVD-ROM IDE Optical Drive Controller Kit Go to product viewer dialog for this item.
. These kits often include a digital display and a remote control for a more professional feel. Power Supply : CD drives typically require both 5V and 12V DC power
. You can use a dedicated switch-mode power supply or an old PC power unit. External DAC (Optional)
: For better sound quality, enthusiasts often use the drive as a "transport" and connect it to an external Digital-to-Analog Converter (DAC) before the amplifier.
: You can build a custom case using anything from a cardboard box to 3D-printed parts or fine wood like pear wood. Pro Tips for Beginners MAKE a CD Player : 4 Steps - Instructables
Connect your donor's I2S output to your new DAC board.
The DIY CD player is divided into three distinct subsystems: