-

Sign In

-
Sign Out
-

Don’t miss out on valuable benefits & tool functionality
Place this Script inside ServerScriptService. This controls the logic, detects movement, and handles the game loop.
-- ServerScriptService/GameManager local ReplicatedStorage = game:GetService("ReplicatedStorage") local Players = game:GetService("Players") local Lighting = game:GetService("Lighting") local GameConfig = require(ReplicatedStorage:WaitForChild("GameConfig"))-- Remotes for UI local Remote_UpdateStatus = Instance.new("RemoteEvent") Remote_UpdateStatus.Name = "Remote_UpdateStatus" Remote_UpdateStatus.Parent = ReplicatedStorage
-- Game State local CurrentState = "Intermission" local isGreenLight = false local alivePlayers = {}
-- Helper Function: Eliminate Player local function EliminatePlayer(player, reason) if not player.Character then return end
-- Visuals local humanoid = player.Character:FindFirstChild("Humanoid") local rootPart = player.Character:FindFirstChild("HumanoidRootPart") if humanoid and humanoid.Health > 0 then print(player.Name .. " eliminated: " .. reason) -- Effects: Red light, Kill sound, Particle Remote_UpdateStatus:FireClient(player, "Eliminated") -- Force Humanoid to 0 health (Showcase style: make it dramatic) humanoid.Health = 0 -- Spawn a dead body dummy for aesthetic (Showcase feature) -- (Optional logic to spawn a ragdoll here) endend
-- Helper: Check Movement local function CheckMovement() while CurrentState == "Playing" and isGreenLight == false do for _, player in pairs(Players:GetPlayers()) do if player.Character and alivePlayers[player] then local humanoid = player.Character:FindFirstChild("Humanoid") -- Check if moving during Red Light if humanoid.MoveDirection.Magnitude > 0 then -- Small delay for lag compensation task.wait(0.1) if humanoid.MoveDirection.Magnitude > 0 then EliminatePlayer(player, "Movement Detected") alivePlayers[player] = nil end end end end task.wait(0.5) -- Scan interval end end
-- Main Game Loop local function GameLoop() while true do -- PHASE 1: INTERMISSION CurrentState = "Intermission" Remote_UpdateStatus:FireAllClients("Intermission", GameConfig.IntermissionTime) print("State: Intermission")
-- Reset Players for _, player in pairs(Players:GetPlayers()) do alivePlayers[player] = true -- Respawn logic would go here if player.Character then player:LoadCharacter() end end task.wait(GameConfig.IntermissionTime) -- PHASE 2: GAMEPLAY (Red Light Green Light) CurrentState = "Playing" Remote_UpdateStatus:FireAllClients("GameStart") print("State: Game Start") local endTime = tick() + GameConfig.GameplayTime while tick() < endTime do -- Green Light isGreenLight = true Remote_UpdateStatus:FireAllClients("GreenLight") -- Play Music 1 task.wait(math.random(3, 6)) -- Red Light isGreenLight = false Remote_UpdateStatus:FireAllClients("RedLight") -- Play Music 2 (Gunshot prep sound) -- Start Movement Checker Coroutine local movementCheck = coroutine.create(CheckMovement) coroutine.resume(movementCheck) task.wait(GameConfig.DollScanTime + 1) -- Wait for scan end -- PHASE 3: END GAME CurrentState = "Results" Remote_UpdateStatus:FireAllClients("GameEnd") task.wait(5) endend
-- Initialize GameLoop()
In the Roblox exploiting community, a Showcase script is typically a flashy, feature-packed script designed to impress viewers: showing off all game-breaking abilities (ESP, auto-win, noclip, etc.) in a Squid Game-inspired Roblox game.
To create a " Squid Game " showcase in Roblox, focusing on the iconic Red Light, Green Light mechanic, you'll need a combination of server-side logic to track the "light" state and client-side detection to catch moving players. 1. Set Up the Environment
Start by opening Roblox Studio and selecting a Baseplate template.
Insert a StringValue: In Workspace, add a StringValue and name it GameStatus. This will hold the value "Green Light" or "Red Light".
Create the Doll: Place a model (like a Bacon Hair or custom character) at the far end of your field. 2. Create the Game Loop (Server Script)
Insert a Script into ServerScriptService to toggle the light states and move the doll's head.
local status = workspace:WaitForChild("GameStatus") local dollHead = workspace.Doll.Head -- Adjust path to your doll's head while true do -- Green Light phase status.Value = "Green Light" dollHead.Rotation = Vector3.new(0, 0, 0) -- Doll looks away print("Green Light - Move!") task.wait(math.random(3, 6)) -- Red Light phase status.Value = "Red Light" dollHead.Rotation = Vector3.new(0, 180, 0) -- Doll turns to look print("Red Light - STOP!") task.wait(math.random(2, 4)) end Use code with caution. Copied to clipboard 3. Detect Movement (Local Script) script de juego del calamar para roblox showcas
To eliminate players who move during a "Red Light," insert a LocalScript into StarterPlayerScripts. Using Humanoid.MoveDirection is the most reliable way to check for active movement.
local player = game.Players.LocalPlayer local status = workspace:WaitForChild("GameStatus") status.Changed:Connect(function(newVal) if newVal == "Red Light" then local character = player.Character if character then local humanoid = character:FindFirstChild("Humanoid") -- Check movement while Red Light is active while status.Value == "Red Light" do if humanoid.MoveDirection.Magnitude > 0 then humanoid.Health = 0 -- Eliminate player break end task.wait(0.1) end end end end) Use code with caution. Copied to clipboard 4. Enhance the Showcase
Add Music: Use Sound:Play() for the "Mugunghwa" song and pause it when the light turns red.
Glass Bridge: For more variety, you can script collapsing glass panels using Touched events that check if a panel is "fake".
GUI Feedback: Create a Countdown GUI to let players know how much time is left in the round. How to make red light green light? - Scripting Support
Title: 🔴🔺 Cracking open the Squid Game Roblox script – Showcase & Test
Body:
You’ve seen the chaos. Now let’s look under the hood. 🦑🔥 Place this Script inside ServerScriptService
I put together a showcase of a Squid Game script for Roblox – no hype, just a straight test of how these automation tools actually run during "Red Light, Green Light," the Glass Bridge, and Dalgona.
What this video/post shows:
✅ Movement smoothing & auto-stopping on red light
✅ Toggleable ESP for player positions
✅ How the script interacts with the game’s hitboxes
✅ Real gameplay capture (no fake “god mode” claims)
⚠️ Important note before you ask for the file:
This is a showcase for educational & entertainment purposes only. Most of these scripts get patched quickly, and many links you find online contain malware, token loggers, or key scrapers. If you’re under 18, talk to a parent before messing with any external Roblox tools – better yet, enjoy the game legit.
💬 Would you want to see a deep dive into anti-cheat detection next?
Drop a 🟡 for yes or 🔴 for “don’t risk it.”
👇 Follow for more Roblox showcases & game dev breakdowns.
Optional visual idea for the post (if you're making a video or graphic):
Un showcase puede simular la tensión:

Updating your tool coverage with a full year TCP subscription is fast and easy. Choose one of four easy ways to renew your coverage and your Autel tool will be up and running with unlimited access to the latest software and functionality.

Pick up a card and enter the number from the back.
Find An Autel DealerRenewing right from the tool is quick and easy.
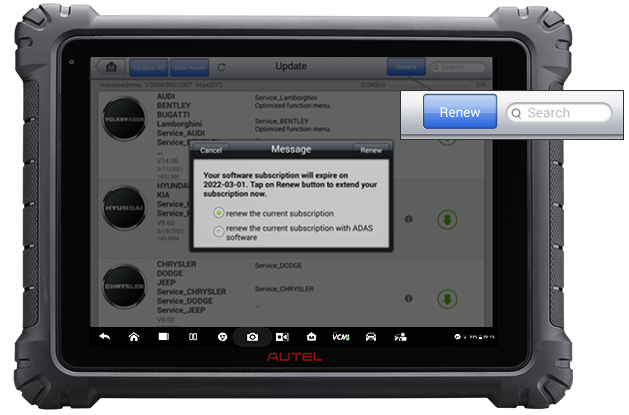
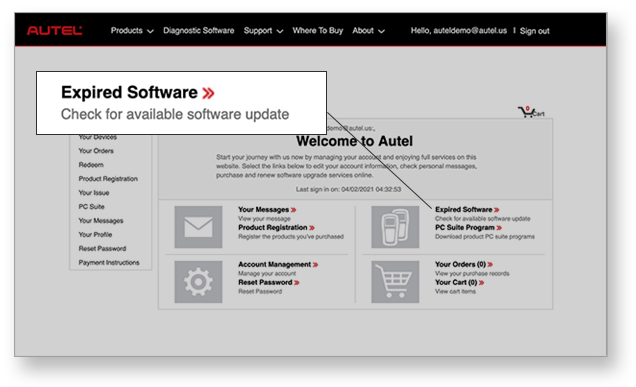
Visit pro.autel.com and sign in with your Autel ID. Click the "Expired Software" link to identify which of your tools needs a software update.
Buy Online Now
Our friendly support staff are happy to guide you through the update process.