Unmatched Robust, Invisible Activity Recording
Operating invisibly, record EVERYTHING your child or your employee does with SpyAgent's wide-array of 50+ computer monitoring features.
A trusted computer monitoring solution for hundreds of thousands of customers for over 25 years, SpyAgent is the top-rated gold-standard for computer monitoring and spy software that allows you to easily see everything your child or employee does on your computer. Updated for 2025 - Windows 11 Optimized!
Operating invisibly, record EVERYTHING your child or your employee does with SpyAgent's wide-array of 50+ computer monitoring features.
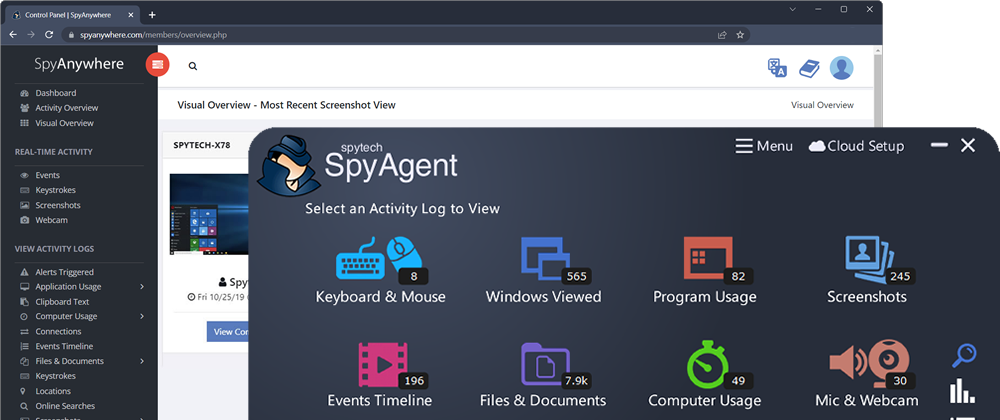
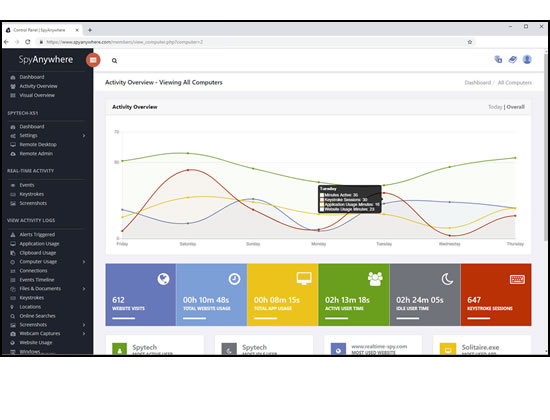
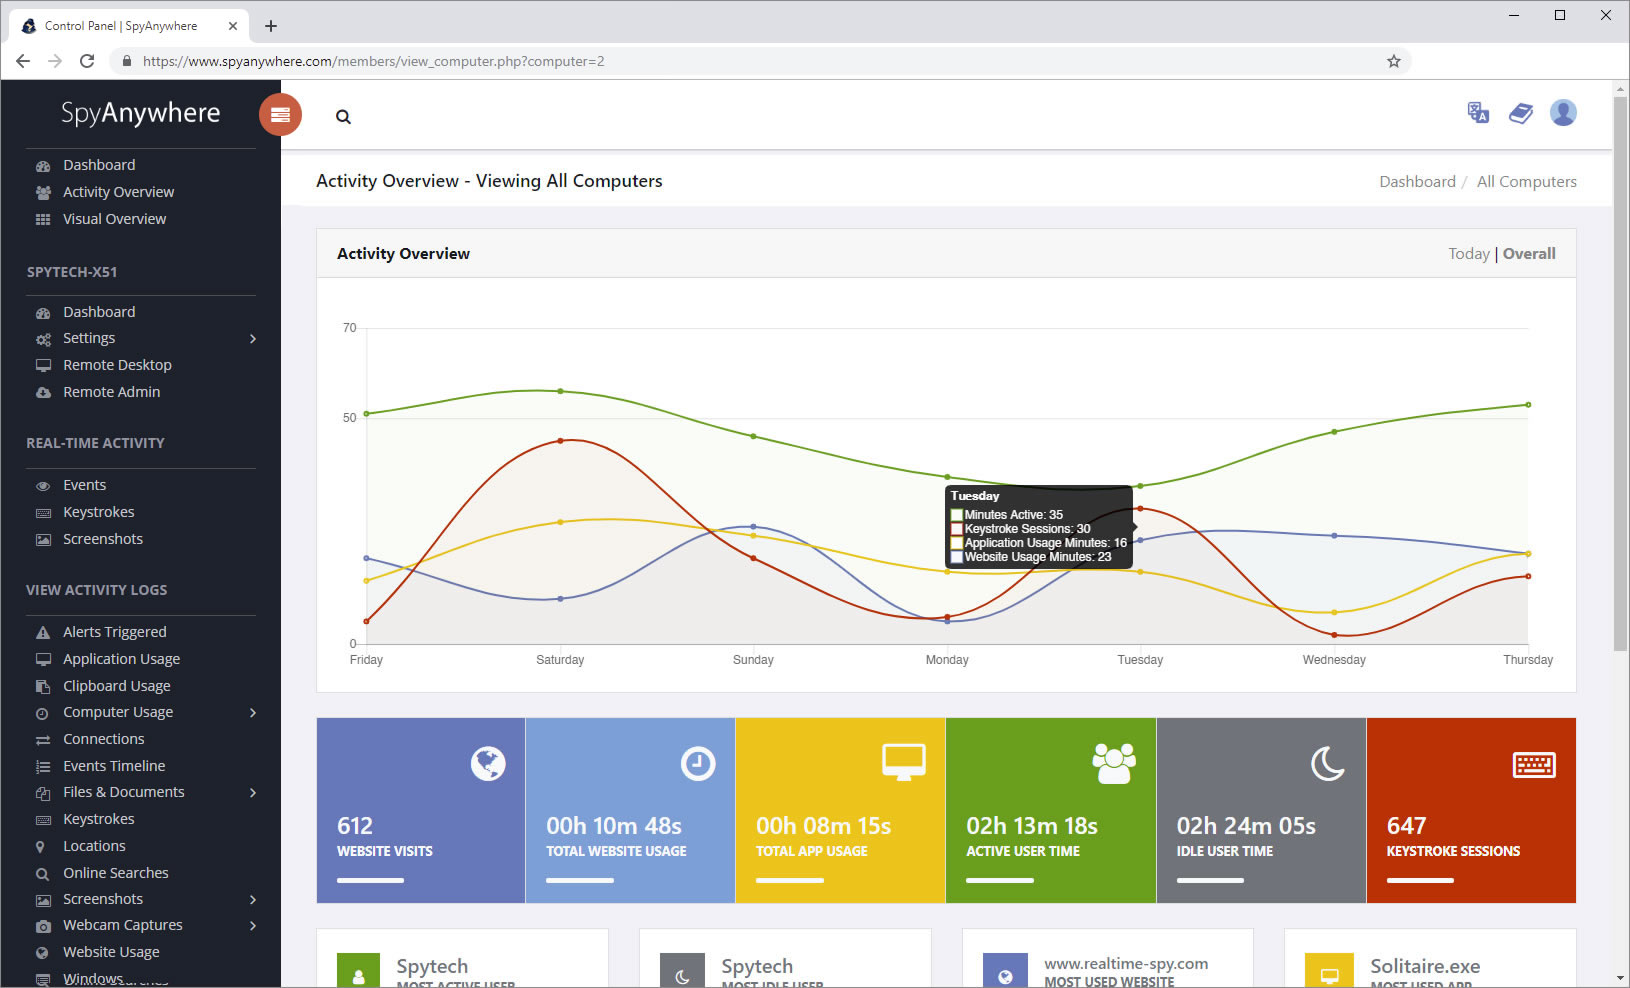
View activities in real-time from anywhere via your browser. Receive email reports and real-time alerts. Remotely uninstall from the cloud!
SpyAgent turns 25 in 2025 which means we have had lots of time and feedback to make an extremely refined computer monitoring solution.
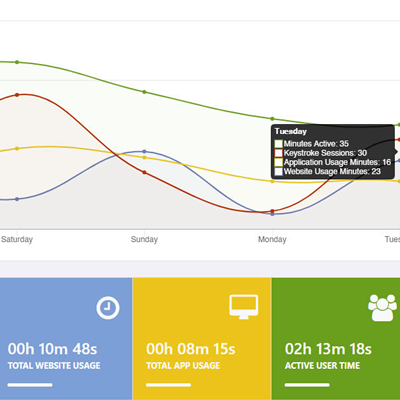
SpyAgent's unmatched all-seeing eye can bring an array of benefits to your family or business environment. With the ability to log all keystrokes, track web and program usage down to the second, and show you everything that has happened with screenshots, SpyAgent helps you learn the truth and put your mind at ease!
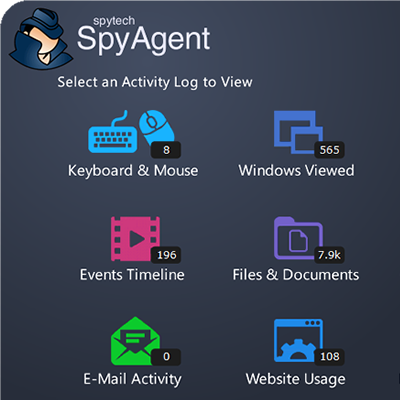
SpyAgent's main purpose is to record everything your child or employee does. Here's what it records.
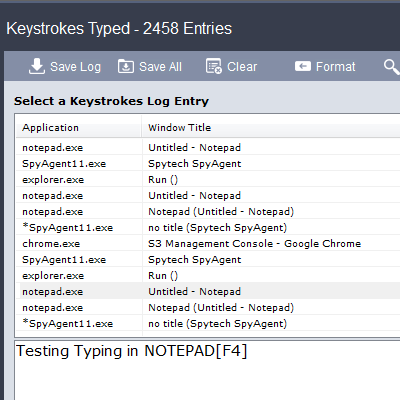
SpyAgent's keylogger logs everything users type - including passwords.
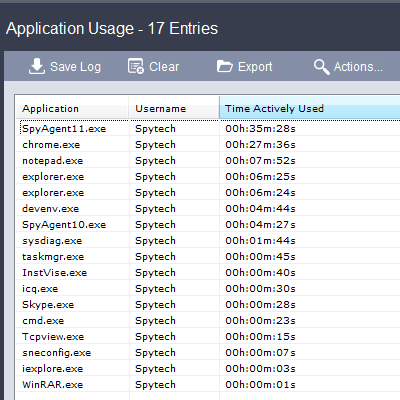
Log what apps are ran, and for how long they are actually interacted with.
Log all visits and online searches, and see how long each page was visited.
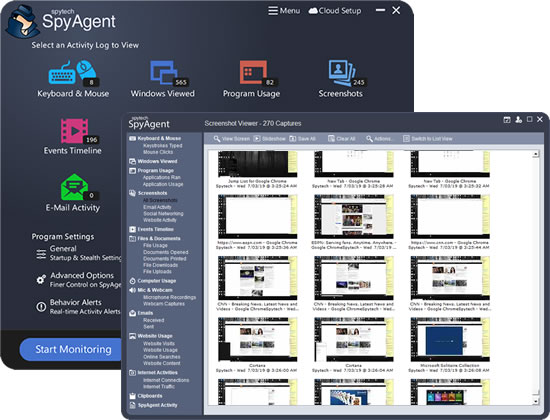
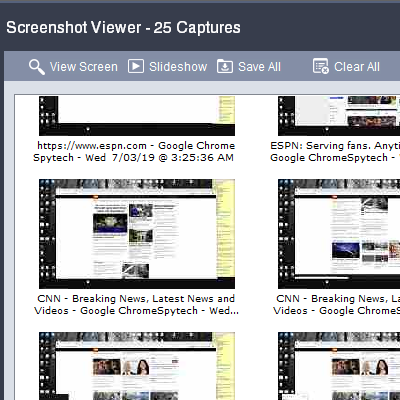
Visual logging of everything done, played back in a convenient slideshow.
Record what is happening around your computer, as well as on it.
Capture images from the webcam to see who is using your computer.
See all social network activity, email messages, and chat sessions.
Track how long your computer is used, and how long users are active.
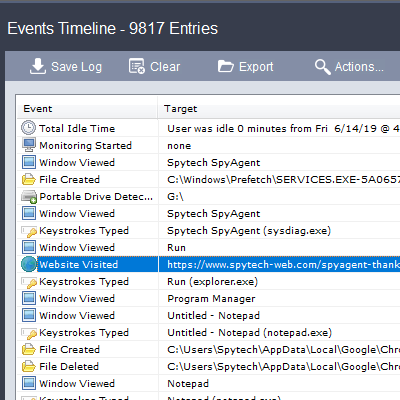
A chronological timeline of everything that has happened on your computer.
Log internet connections established, and even actual raw internet traffic data.
Log what files are used, copied, renamed, deleted, and even transferred.
Log every mouse click action, along with where it was clicked.
SpyAgent is not just a full-featured computer monitoring solution; it's feature set goes above and beyond just monitoring and includes many more useful features - like comprehensive activity filtering, real-time behavior alerts, cloud access, smart logging, self-destruct uninstall, graphical log reports, and more!
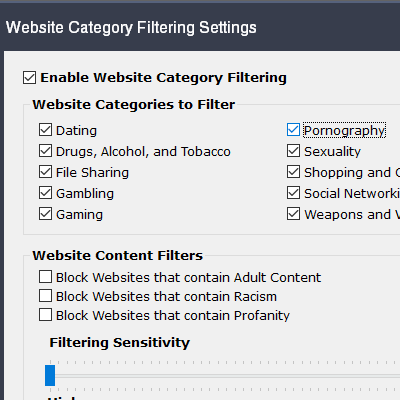
SpyAgent can block websites, chat clients, and applications used. It can alert you in real-time when filters are triggered, and when keywords are typed.
Activity triggered monitoring and screenshot captures provide flexible logging. SpyAgent's report generator provides useful Top-10 and 'Most Popular' reports.
SpyAgent provides powerful built-in log viewers for local access and management, as well as cloud access and log deliveries via email and FTP for remote monitoring.
Besides being the most full-featured computer monitoring solution available, here are some more reasons to choose SpyAgent.

Top10Reviews.com

T5A.com

Keylogger.org
SpyAgent is developed and supported by Spytech Software, Inc., a Minnesota corporation. It was first introduced in early 2000 and was immediately a popular choice for computer monitoring needs. Years of listening to customer feedback and refinement has made SpyAgent into a world-class security solution that parents, families, schools, institutions, and corporations benefit from. SpyAgent has consistently proved to be a cutting-edge solution with its easy to use graphical user interface, innovative feature additions, and vigilant updates.
Spytech SpyAgent will continue to be a leading computer monitoring solution for many more years to come.
Should you have any questions or troubles with SpyAgent, Spytech is here to help you. Our 24/7 helpdesk can solve any technical problem you are having, as well as schedule remote assistance so we can quickly connect to your computer and set things up for you and ensure everything is working properly.
Step 1: Prepare the SD Card Insert your microSD card into your computer. Right-click the drive and select "Format." Choose FAT32. If the card is larger than 32GB, create a small 8GB partition. Name the volume "FOKOOS" (optional but helpful).
Step 2: Rename the Firmware File
This is the most common point of failure. The bootloader on the Odin-5 F3 will only flash a .bin file if the filename is different from the last file you flashed.
Step 3: Copy and Eject
Copy the renamed .bin file to the root directory of the SD card. Do not put it inside a folder. Safely eject the card from your PC.
Step 4: Power Cycle the Printer
Step 5: Observe the LCD The screen will likely stay blue or black for 10–30 seconds. Do not touch anything. When the flash is successful, the printer will boot to the main menu. If it boots instantly without delay, the flash failed (likely a bad filename or wrong file type).
Step 6: Reset EEPROM After flashing, navigate to Configuration > Advanced > Reset EEPROM. This clears old settings that may conflict with the new firmware.
The fokoos odin-5 f3 firmware scene has matured significantly. While the stock firmware is stable for basic PLA printing, the machine is truly capable of so much more. Whether you opt for a pre-compiled community build or roll your own Marlin configuration, updating the firmware is the single best upgrade you can perform for zero dollars.
Remember to format your SD card correctly, rename your .bin file uniquely, and always reset your EEPROM after a flash. With the right firmware, your humble Odin-5 F3 can punch well above its weight class, competing with printers twice its price.
Have you successfully compiled a custom build for the F3? Share your configuration file in the community forums to help fellow makers.
Article Metadata:
Updating the firmware on your Fokoos Odin-5 F3 can significantly improve its performance by adding features like manual mesh bed leveling, input shaping for faster printing, and better temperature visibility Preparation MicroSD Card: Use a high-quality, 8GB or 16GB MicroSD card formatted to allocation unit size. Firmware Files: Most users opt for community-maintained
firmware (like version 2.1.3) which is often hosted on GitHub or shared by creators like Joe Prints
Record your current E-step values and any custom offsets before starting, as these may be reset. The Flashing Process
The Odin-5 F3 typically requires updating two separate components: the motherboard touchscreen (HMI) 1. Motherboard Firmware firmware file (e.g., Odin-5-F3-Marlin.bin ) to the root of your MicroSD card. Ensure the file is the only file on the card. With the printer turned off , insert the card into the printer's mainboard slot.
Power on the printer. The screen may stay blank for 10–30 seconds as the firmware flashes.
Once the main menu appears, the motherboard update is complete. 2. Touchscreen (LCD) Firmware
The touchscreen often has its own internal firmware that must match the motherboard version for all buttons to work correctly. Locate the folder from your firmware download. Format your MicroSD card again and copy the entire folder to the root. You must access the MicroSD slot
the screen housing (you may need to unscrew the back of the screen assembly).
Insert the card into the screen's internal slot and power on the printer.
A blue or orange screen will show the progress. Wait until it says "End" or "Finished." Turn off the printer, remove the card , and reassemble the screen. Post-Update Setup
After a successful flash, you should perform these maintenance steps: Initialize EEPROM: Navigate to Configuration > Store Settings or send the G-code command followed by to ensure no old settings interfere with the new firmware. Level the Bed:
If you upgraded to a version with manual mesh leveling, run through the leveling wizard to create your first bed mesh. Calibrate E-Steps: fokoos odin-5 f3 firmware
Verify your extruder is still pushing the correct amount of filament. links to specific GitHub repositories
for the Marlin 2.1.3 build, or are you looking for help with custom compiling your own firmware?
Getting the most out of your Fokoos Odin-5 F3 often involves moving beyond the stock software. Because this printer is based on open-source architecture, you have several "paths" to explore for better performance and features. 1. The Marlin Upgrade Path (Most Common)
Upgrading to a newer version of Marlin Firmware is the standard move for Odin-5 F3 owners. Key Features Gained:
Manual Mesh Bed Leveling: Add a leveling grid to compensate for a warped bed without needing extra hardware.
Input Shaping: Reduces "ghosting" or ringing on prints, allowing you to increase your print speeds significantly.
Better UI: Updated Marlin builds often provide clearer temperature readouts for the hotend and bed.
Where to find it: Community members often share pre-compiled .bin files on GitHub or via video guides like those found on YouTube. 2. Wireless Freedom with ESP3D
You can add Wi-Fi capabilities to your Odin-5 F3 by flashing firmware that supports the ESP3D WebUI.
What it does: This allows you to control your printer through a web browser, similar to OctoPrint but running directly on the printer's hardware or a cheap ESP chip.
Benefit: You can upload G-code files and monitor print progress wirelessly without needing a Raspberry Pi. 3. Transitioning to Klipper
While Marlin is the default, many power users transition to Klipper.
Why it's "Interesting": Klipper offloads the heavy processing to a secondary computer (like a Raspberry Pi), which can result in even faster speeds and more precise motor movements than Marlin.
Customization: It uses simple configuration files instead of requiring you to recompile the firmware every time you want to change a setting. Quick Firmware Safety Tips
Check Your Version: Before updating, check your current version in the printer's "About" or "System" menu.
Backup First: Always keep a copy of your original firmware (if available from Fokoos) in case you need to revert.
Method: Most Odin-5 F3 updates are done by placing a .bin file on the root of your microSD card and restarting the printer.
Updating the firmware on your Fokoos Odin-5 F3 can significantly improve its performance by adding features like manual mesh bed leveling, input shaping for faster printing, and better temperature visibility. Available Firmware Options Marlin 2.1.3 (Community Update)
: A popular upgrade that addresses common user complaints by adding manual mesh bed leveling and Input Shaping to allow for faster print speeds. MKS Original Marlin
: Custom builds available through community groups (like the Fokoos Facebook Group
) often include quality-of-life additions, such as "one-tap" heating buttons and live Z-offset adjustments during a print. Step 1: Prepare the SD Card Insert your
: For advanced users, the Odin-5 F3 can run Klipper (using an MKS Robin Nano v1.2 board config). Note that this typically disables the printer's stock touchscreen, which will remain on a "Booting..." screen
while the printer is controlled via a web interface like Mainsail or Fluidd. How to Flash New Firmware Prepare the SD Card : Format a micro SD card to Download & Rename : Obtain the firmware file. It must be named exactly Robin_nano35.bin for the printer's board to recognize it. Include Assets
: If your firmware version includes a custom UI, you must also copy the folder to the root of the SD card.
: With the printer turned off, insert the SD card. Power on the printer, and it will automatically begin the update process, which is usually indicated by a progress bar or update interface Key Hardware Specs for Configuration
If you are compiling your own firmware (e.g., using VS Code and PlatformIO), use these settings: Motherboard BOARD_MKS_ROBIN_NANO Board Version : MKS Robin Nano v1.2. #define MKS_TS35_V2_0 #define MKS_ROBIN_TFT35 depending on the specific UI build. Environment mks_robin_nano35 links to the specific GitHub repositories for the Marlin or Klipper configuration files?
The Ultimate Guide to Fokoos Odin-5 F3 Firmware: Stock vs. Custom Marlin Updates
The Fokoos Odin-5 F3 is a standout foldable 3D printer, but its true performance is often locked behind its software. Whether you are looking to fix bugs, add a BL-Touch for auto-bed leveling, or enable advanced features like Input Shaping, updating your firmware is the single most impactful upgrade you can perform. Understanding the Hardware: The MKS Robin Nano
Before downloading any files, you must know what is under the hood. The Odin-5 F3 utilizes the MKS Robin Nano motherboard (typically V1.x or V3.x).
Processor: 32-bit architecture for silent, smooth movements.
Interface: Supports colorful GUI and touchscreens via the LittlevGL library.
Open Source: The printer is designed to be fully compatible with Marlin-based open-source platforms. Top Firmware Options for the Odin-5 F3
Depending on your skill level and needs, you have three primary paths: Firmware Type Key Features Stock Firmware Beginners / Stability Original UI, factory-tested settings. Marlin 2.1.x (Custom) Performance Seekers
Input Shaping (faster printing), Linear Advance, Manual Mesh Leveling. BL-Touch/3D-Touch Ease of Use Enables Automatic Bed Leveling (ABL) hardware support. How to Update Your Fokoos Odin-5 F3 Firmware
The update process for this printer is "flash-and-go" via the SD card slot. Fokoos Odin-5 F3 Firmware Hot!
Updating the Fokoos Odin-5 F3 Go to product viewer dialog for this item.
firmware is a primary way to unlock high-performance features like Input Shaping, Linear Advance, and Auto Bed Leveling (ABL). The stock firmware is often limited, leading many users to switch to community-driven Marlin or Klipper builds for better reliability and print quality. 🚀 Recommended Firmware Upgrades Firmware Type Key Features Marlin 2.1.x Reliability & Ease of Use
Manual mesh leveling, Input Shaping, temperature visibility. Klipper High-Speed Printing Web interface control, advanced resonance compensation. Mike King’s Custom Community Stability Specifically tuned for with BL-Touch support. 🛠️ Step-by-Step Installation Process Upgrading typically uses the MKS Robin Nano motherboard's built-in bootloader. Prepare the SD Card:
Use a FAT32 formatted microSD card (ideally 8GB or smaller). Add Firmware Files:
Place the .bin firmware file and the assets folder (containing UI icons) in the root directory. Flash the Printer: Turn off the printer. Insert the SD card into the motherboard slot.
Power on. You should see an update progress bar on the touchscreen. Calibrate Post-Update:
Z-Offset: If using ABL, you must recalibrate your probe Z-offset immediately. Step 3: Copy and Eject Copy the renamed
E-Steps: Verify your extruder steps to ensure accurate material flow. 🔧 Essential Modifications Supported by Firmware
Advanced firmware allows you to integrate hardware upgrades seamlessly:
Yes, but with limitations. The Odin-5 F3 uses a CH32F103 (or similar ARM Cortex-M3) mainboard. This opens the door to:
Risks: Custom firmware voids the warranty, and improper configuration can permanently damage the LCD or UV LED array. Only attempt if you have a USB-to-serial adapter and know how to restore the original bootloader.
Unlike major brands (Creality, Anycubic), Fokoos does not have a centralized support portal. The official sources are:
Recommended approach: Join the official Fokoos Facebook group and search for "Firmware F3 pinned post". As of 2025, the latest stable version is usually Odin5_F3_V4.2.7.bin or similar.
Unlike older printers that required USBASP programmers, the Odin-5 F3 supports SD Card flashing. This is relatively straightforward, but you must follow the steps precisely.
The stock firmware that ships with the F3 is stable, but it is rarely the latest version. Updating unlocks several benefits:
If you're still on stock firmware and want improvements:
Would you like help identifying your current firmware version or tips on compiling your own Marlin for the Odin-5 F3?
FOKOOS Odin-5 F3 utilizes open-source Marlin firmware Makerbase (MKS) Robin Nano v1.2
motherboard. While the stock firmware provides a stable experience, many users upgrade to community-maintained versions to unlock features like manual mesh bed leveling input shaping BLTouch/3DTouch Firmware Options Stock Firmware : A proprietary version of Marlin based on the Robin Nano
codebase. It supports basic FDM printing with a direct drive extruder. Official source files and factory reset binaries can be found on the FOKOOSTech GitHub Marlin Community Upgrades : Popular upgrades like Marlin 2.1.2 introduce advanced features such as: Manual Mesh Bed Leveling : Improves first-layer adhesion without adding hardware. Input Shaping
: Reduces vibrations to allow for faster print speeds (up to 150 mm/s). Enhanced UI : Updated graphics and more granular touchscreen settings. Klipper Firmware
: For advanced users, Klipper offloads processing to a Raspberry Pi. While it significantly improves speed and quality through pressure advance and input shaping, the printer's built-in touchscreen will only display "Booting..." as it is not natively supported. How to Update Firmware
The update process is straightforward and does not require a computer connection. Prepare the SD Card : Use a blank, FAT32-formatted microSD card. Copy Files : Place the firmware file (typically named Robin_nano35.bin folder into the root directory of the SD card. Flash the Printer Power off the printer. Insert the microSD card into the motherboard slot.
Power on the printer; an update interface should automatically appear on the screen. Post-Update
: Remove the SD card and delete the update files to prevent the printer from re-flashing every time it starts. Feature Support Matrix
The firmware is the operating system of your printer’s mainboard. It controls:
An outdated or corrupted fokoos odin-5 f3 firmware can lead to layer shifts, blank screens, failed exposures, or a printer that refuses to boot. Conversely, the latest firmware often brings bug fixes, faster print times, and better compatibility with third-party resins.
Purchase SpyAgent and Start Monitoring Today! Risk-free Purchase - 15 day Money back Guarantee!
Download SpyAgent's installation software to your computer. Your download is available immediately after purchasing from our secure website.
Run SpyAgent's installer on the computer you want to monitor and customize your monitoring options to suit your needs.
Start monitoring your computer. View all recorded activities by accessing SpyAgent on the monitored computer, or remotely via our cloud website.
SpyAgent downloads and installs in under 5 minutes. Let us do it for you with our free remote install service, too!
Our award-winning computer monitoring software for the last 25 years, SpyAgent installs in just minutes and allows you to record everything that happens on your computer.
The Stealth Edition installer installs SpyAgent 'hands free' in less than 10 seconds and starts monitoring in optimized stealth mode instantly. You can fine-tune settings afterwards, if desired.
SpyAgent's Remote Suite includes a cloud-based service that allows you to view SpyAgent's logs in real-time through your web-browser from anywhere, even if the monitored computer is offline.
No Risk return policy, no hidden fees, and 24/7 support is always free (including remote assistance and installation).
